Although building a site with Webflow takes care of many content, design, and code accessibility considerations, there are a few extra steps required to make a fully accessible Webflow website.
It’s key to make sure these accessibility details are taken care of when you’re working on a new site or with your next site update since, without them, you could be preventing some of your audience from using your site effectively (or using your site at all).
An accessible website opens up new market opportunities by ensuring all the information on your website is available to disabled users or people with other accommodation needs.
Accessible websites also help improve access for all by ensuring your content is as understandable and available as possible across all devices and potential use cases.
Let’s walk through the areas you’ll need to consider and implement for an accessible Webflow site.
Landmarks and page structure
Webflow makes structuring your pages for screen readers and keyboards fairly straight-forward with changes to a few different settings on your page elements.
A survey from WebAim found that almost 60% of screen reader users used landmarks at least occasionally when browsing websites.
One of the most important things you’ll want to implement is landmarks. The best way to do this is by looking at your page’s major elements (navigation, footer, the main body of your page) and making sure the appropriate landmark is set.
Webflow steps for setting landmarks
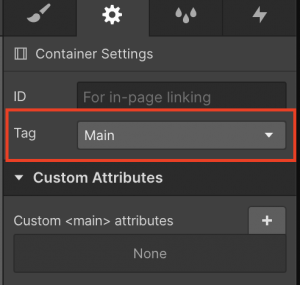
Click on any element. In the right sidebar, click on the element Settings to set its Tag (Webflow’s setting for landmarks). Your navigation landmark will typically already be taken care of by Webflow if you’re using a navbar component, but you’ll need to set the main container for your content as “Main” and your footer as “Footer” in these settings.
Adding a skip navigation link
Another crucial part of making a website accessible is ensuring that screen reader users or keyboard-only users can skip having to go through your navigation links every time they reach a new page of your site. Webflow doesn’t have a built-in way to do this yet, so a skip navigation will need to be built into your site using custom code.
Webflow steps for adding a skip navigation link
This tutorial will help you implement the functional part of the skip navigation (which you’ll need to add to each of your pages and templates) and this guide will provide the necessary code to hide the skip navigation until it is revealed by tabbing to it.
By combining these two tutorials, you’ll be able to add skip navigation to your site, making it more usable for keyboard-only and screen reader users.
Make sure to create a site map page
One accessibility standard that’s often overlooked is support for multiple ways to navigate through a site easily. Your menu and link structure will typically take care of one way of doing this, but adding a site map is key to making the rest of your site’s pages discoverable.
Something that often gets confused in this process is the difference between a sitemap for search engine indexing (e.g. an XML/auto-generated site map) and a site map page that is available to your site’s users. Webflow will auto-generate an SEO sitemap for you if the setting is enabled, but a site map for your users will need to be created by you using a standard Webflow page.
Webflow steps for creating a site map page
To make a site map page:
- structure a page with an overall heading of “Site Map”;
- add headers for each of the main categories of pages on your site;
- include links to every page of your site on this page under the appropriate categories.
This page on our volunteer org site for Together is an example of a simple site map for accessibility purposes created with Webflow.
Bonus: site map pages are also a benefit for SEO (search engine optimization) as they highlight and link to all the most important pages of your site.
Adding this page to your website and linking it in the footer will ensure that anyone looking for a specific page can find it more easily, especially if your site does not have search functionality, and it will also provide an extra boost to your SEO.
Making your site’s menu accessible
Another part of making a Webflow site accessible is making sure your menu works and is usable for all of your users.
This can involve many considerations depending on dropdowns, hover states, and more, but at its most basic, you should ensure that you add a state change (e.g. an underline on hover and selection) rather than just a colour change, and make sure that all menu items have a focus state when a keyboard user tabs to them.
Webflow steps for more accessible menus
Typically, all Webflow stock navigation will have focus states, but you will need to add underlines yourself so that changes on hover are also more accessible.
Ensure your Webflow forms are accessible
Forms can often present a complex accessibility challenge, but Webflow settings are available to make accessible forms without any custom code.
Some tips to boost your form’s accessibility
Ensure error states have a symbol and text associated with them, along with any colour change you might use to indicate errors.
The Webflow default is just an error message with a colour change, but colour changes aren’t necessarily visible to everyone, which is why an error symbol is a great addition. As an example, we like to use a rounded triangle with an exclamation mark inside of it.

Make sure your form labels are properly associated with the fields (this will also ensure your form responses make sense!)
To do this, in the settings for each text field, ensure the name is the same as the field label above. This ensures no confusion about which field belongs to which label.
One additional step to ensure your form fields are fully ARIA compliant (necessary for accessibility in many cases) is to change the name of your field to be a custom HTML field, to create a “for” label. This change ensures that screen readers can better understand the fields used.
This tutorial from Jeff S can help you implement these changes for your form fields
Ensure your focus states for your form fields have enough contrast and are present for all fields.
The focus states on your form field are a way for users to tell which field they are currently filling out when using a keyboard to navigate. It’s best to use a combination of a thicker box around the field, a contrast change in the colour, and/or a shadow around the field to ensure the focus states are as clear as possible.


Webflow accessibility tools and resources
As you’re putting your site together, be sure to take advantage of Webflow’s built-in accessibility capabilities and learning resources.
Baked into Webflow is the ability to add alternative text descriptions to each of your images. You can also make your site more accessible by making sure you use correct headings, e.g. an H2 should come before an H3.
Webflow has recently released an accessibility tool right in the designer that will catch a lot of these smaller issues for you automatically.
You can also learn more about accessibility basics from Webflow university.
Webflow is a great accessibility platform for your site
Webflow accessibility can seem daunting, but it’s totally doable by following our Webflow accessibility guide along with general content, design, and code accessibility best practices. In fact, Webflow is one of the top website platforms we’ve reviewed for accessibility. It’s up to you to take advantage of this great opportunity to make your site more accessible to your audience!
And, by doing this work as you’re putting your site together, you’ll make sure you don’t have to reconstruct your template later in order to make your site, and your content, more accessible to everyone.
Looking for additional support on making a more usable, accessible, and inclusive website?
Get started with our Inclusive Website Audit to uncover issues with your current website or get in touch to learn more about our accessible website design services.